The solar panel is a device that directly converts light energy into electric energy through the photoelectric effect or photochemical effect.
How to set up solar power?
Step 1: Calculate your power load
Before starting the solar installation task, it is crucial to summarize the electricity used in your home. What is your daily or monthly electric power demand? Or what is the total power of all your household electric appliances? And their daily working hours? Including TV, light, fan, etc.
You can determine the power of the solar panel ,according to the daily use time of the household appliances you use every day. You need to calculate the running time of these appliances in a day. Check the specification sheet in the home appliance for its use duration or operation time and rated power.
Calculate the ‘Watt-Hour’ by multiplying the runtime of an appliance with its power rating. Follow this step for each electrical device, then sum up the individual watt-hour numbers to get the total. You can also simplify this calculation by using an online off-grid load calculator.
Step 2:
Do you need a solar panel off-grid system or a solar panel on-grid system?
Do you need a bracket?
If the bracket needs to install: it is necessary to determine the installation position of the solar panel, the ground, the roof, and whether the roof installation is flat or inclined (or the requirements for installing the bracket).
Off-grid solar panel systems need to use with batteries.
Step 3: collect solar modules
(1) It all begins starts with collecting the basic components of a solar power unit. You will need four main items - solar panels, charge controllers, inverters, and battery packs. In addition to these items, you also need circuit breakers, meters, PV connectors, and fuses among other things. Keep in mind that it is essential to read the solar panel module instructions.
The solar cell output power we mentioned is the output power of the solar cell under the standard solar illumination conditions, that is, under the 101 standard defined by the European Commission, the radiation intensity is 1000W / m2, the atmospheric quality is AM1.5, and the cell temperature is 25 ℃. That is to say, the output power of the same solar cell is different at different times and different places. At the same time,please pay attention to adjusting the tilt angle of the solar panels so that they receive more radiation. Another point to note is that the output voltage of the solar panel string needs to be higher than the maximum voltage of the battery.
(2) Select the appropriate controller:
The controller is the most important medium of the solar panel to the battery and DC load. Because the solar panel generates unstable power, the current is large under strong irradiance, and the current is small under low irradiance. It is likely to cause damage to the battery, so the controller accurately controls the input voltage and current.
Firstly, the power consumption of a day is determined according to the power and power consumption time of the load. Second, the total power consumption is calculated by adding the reservation on rainy days. Then determine the total capacity of the battery according to the total power consumption. Then reasonably distribute the capacity, number, connection mode of a single battery, and then calculate the power of the solar panel according to the power consumption of the load. The controller is selected by determining the charging current according to the power of the solar panel and the system voltage.
(3) Set up inverter
As we all know, in the off-grid solar power generation system, low-voltage DC power flows from the solar panel to the controller and finally to the battery from beginning to end. If we have a high-power AC load that we want to use, but the load terminal of the controller can only connect to a low-power DC load. How to solve the contradiction and how to make the whole system play the best role? At this time, we need to use an inverter.
Solar arrays generate electricity by direct current (DC), but appliances use alternating current (AC). An inverter is a time-saving device that allows you to use electrical equipment without using adapters. The inverter is an electronic device that uses a high-frequency bridge circuit to convert DC into AC. Its function is opposite to a rectifier. It can directly supply the power for the battery or the power output by the onboard cigarette lighter to 110V or 220V household appliances. It has overtemperature protection, input low-voltage protection, input high-voltage protection, overload protection, short-circuit protection, etc.
It ensures that the inverter can be protected during use, and there will be no hidden dangers such as high temperature and short circuits.
Inverters have different wattage and types, including square wave, modified sine wave, and pure sine wave inverters. The square wave is not applicable to all equipment, and the output of the corrected sine wave is not applicable to some electrical appliances, such as refrigerators. This makes the pure sine wave inverter the best choice for your solar system. The maximum output power of the inverter shall be greater than the load power.
Step 4: select and charge the battery
A major problem with solar energy is that it does not provide electricity when the sun goes down. However, you can easy to solve this problem with batteries. Lead-acid or lithium-ion batteries store solar energy generated during the day and discharge it at night. It provides a stable energy supply if you choose the best battery storage capacity.
Generally, the selection of battery capacity shall follow the following principles: firstly, on the premise of meeting the lighting at night, store the energy of solar cell modules during the day as much as possible, and at the same time, store the electricity to meet the lighting needs at night in continuous cloudy and rainy days. If the battery capacity is too small, it cannot meet the needs of night lighting; if the battery capacity is too large, on the one hand, the battery is always in a state of power loss, which will affect the battery life and cause waste.
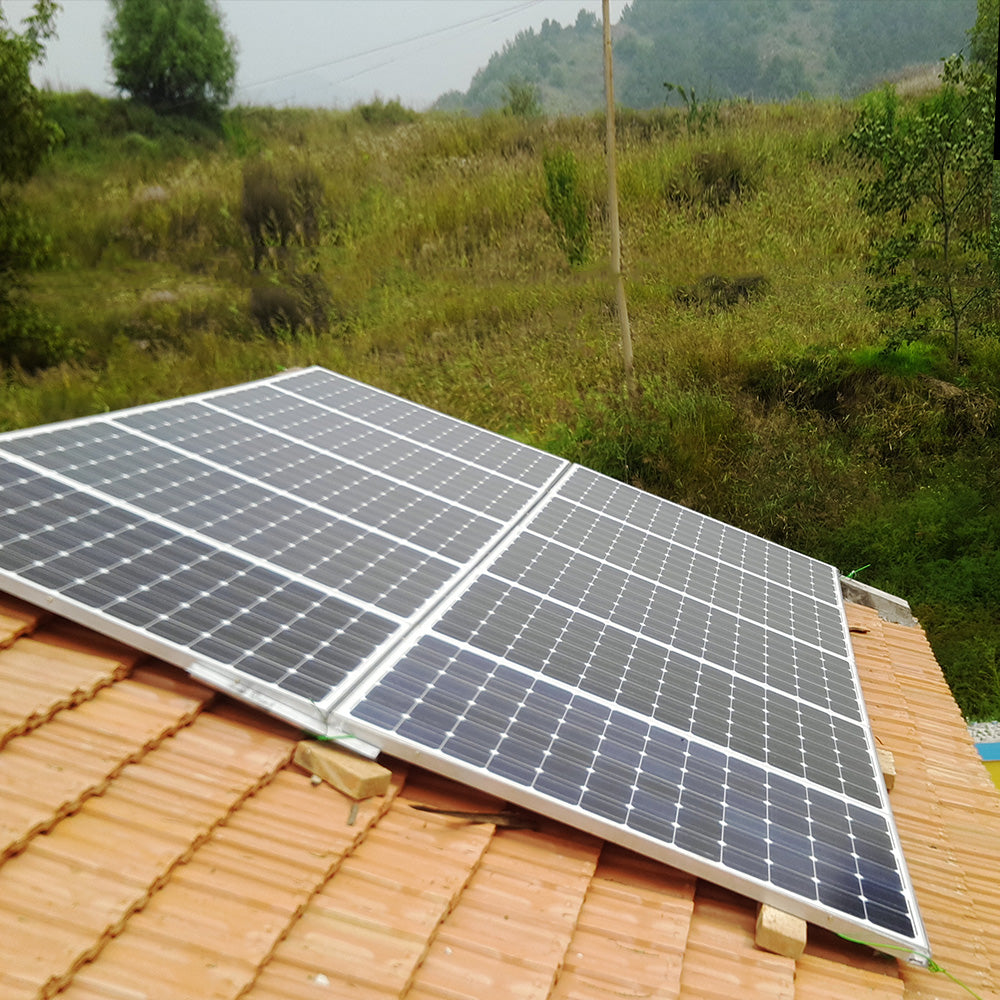
Step 5: fix the solar panel on the roof
Once the battery, controller, and inverters are ready, you need to get started with mounting the solar panels. Select the best location for panels on roofs or open ground to receive an unobstructed supply of solar radiation. You can make the mounting bracket by yourself, or buy it from the market. The inclination of the mounting bracket should be almost equal to the latitude angle of your position. The correct setting of solar panels is important for their operation and maintenance. Therefore, it is necessary to ensure that the solar panel faces the sun all day.
Step 6: connect the solar panel to the battery
You need to connect the solar panel with the battery. In some photovoltaic systems, they are paired, so you don't need to make extra efforts. In cases that are not given as a single unit, you need to make series and parallel connections. You can connect the positive terminal of one device in series with the negative terminal of another device. For parallel connection, you need to connect the negative terminal of one device to the negative terminal of another device, and so on. (The series or parallel connection of solar panels depends on the voltage of the battery/battery pack. The output voltage of solar panels is generally about 1.5 times the voltage of the battery/battery pack.)
Precautions for installation of the solar system
- When connecting the solar system, first connect the controller to the battery, and then connect the solar panel. Do not reverse the connection order.
- Please install the controller in a well-ventilated area such as indoors or shadows to avoid exposure of components and prevent water from entering the controller.
- The total power of the solar panel and DC load cannot be greater than the rated power of the controller (voltage × current), otherwise, there may be a risk of burning the controller.
- The inverter cannot be connected to the controller but must be connected to the battery.
- After installation, check whether all line connections are tight to avoid the danger of heat accumulation due to virtual connection.
- The positive and negative poles of the solar panel in the same series connection cannot be short-circuited to prevent damage to the solar panel.
- The positive and negative poles of the controller and battery should be checked clearly. Do not connect the positive and negative poles in reverse.
Following these steps can guide you to set up a solar power unit at your home. The high costs incurred in installing one can be reaped later on as solar energy is not only clean but also a cost-effective investment.